
Make a simple program with gripper and release command. Than look at the .script file generated after executing the program. You will see in the script how SET and GET functions are used.
 ayushkumar
 bcastets
Just mention the original article about how to control gripper connected on UR robot using socket communication.
https://dof.robotiq.com/discussion/2420/control-robotiq-gripper-mounted-on-ur-robot-via-socket-communication-python#latest
Here below is the definition of ePIck URscript functions which can be found in the .script file generated when you execute a program.
By looking at the definition of those function you will be able to understand which GET and SET command you can send to control ePick.
Look at rq_set_var and rq_get_var functions.
#################################################
# Vacuum general functions
#################################################
def rq_wait_for_vacuum_object_detected(gripper_socket="1"):
while (not rq_is_vacuum_obj_detected(gripper_socket)):
if (rq_is_vacuum_timeout(gripper_socket)):
return False
end
sleep(0.008)
end
return True
end
def rq_wait_for_vacuum_object_secured(gripper_socket="1"):
while (not rq_is_vacuum_obj_secured(gripper_socket)):
if (rq_is_vacuum_timeout(gripper_socket)):
return False
end
sleep(0.008)
end
return True
end
def rq_wait_for_vacuum_object_suction_complete(gripper_socket="1"):
remaining_retries = 50
# Wait for suction started
while (not rq_is_vacuum_obj_in_suction(gripper_socket) and
not rq_is_vacuum_obj_detected(gripper_socket) and
remaining_retries > 0):
sleep(0.01)
remaining_retries = remaining_retries - 1
end
# Wait for suction completed
while (rq_is_vacuum_obj_in_suction(gripper_socket)):
if (rq_is_vacuum_timeout(gripper_socket)):
return False
end
sleep(0.01)
end
return True
end
def rq_wait_for_vacuum_object_not_detected(gripper_socket="1"):
while (rq_is_vacuum_obj_detected(gripper_socket)):
sleep(0.01)
end
end
def rq_is_vacuum_obj_detected(gripper_socket="1"):
gOBJ = rq_get_var("OBJ", 1, gripper_socket)
sleep(0.008)
return is_vacuum_OBJ_object_detected(gOBJ)
end
def rq_is_vacuum_obj_secured(gripper_socket="1"):
gOBJ = rq_get_var("OBJ", 1, gripper_socket)
sleep(0.008)
return is_vacuum_OBJ_object_secured(gOBJ)
end
def rq_is_vacuum_obj_in_suction(gripper_socket="1"):
gOBJ = rq_get_var("OBJ", 1, gripper_socket)
sleep(0.008)
if(is_vacuum_OBJ_object_in_motion(gOBJ)):
return True
else:
return False
end
end
def rq_is_vacuum_timeout(gripper_socket="1"):
gFLT = rq_get_var("FLT", 2, gripper_socket)
sleep(0.008)
if(gFLT ==6):
return True
end
return False
end
def is_vacuum_OBJ_object_in_motion(gOBJ):
if (gOBJ == 0):
return True
end
return False
end
def is_vacuum_OBJ_object_detected(gOBJ):
if (gOBJ == 1 or gOBJ == 2):
return True
end
return False
end
def is_vacuum_OBJ_object_secured(gOBJ):
if (gOBJ == 2):
return True
end
return False
end
def rq_set_pressure_timeout_minimum_vacuum(pressure, timeout, minimum, gripper_socket="1"):
rq_set_pos_spd_for(pressure, timeout, minimum, gripper_socket)
end
def rq_set_vacuum_and_wait(pressure, timeout, minimum, mode, gripper_socket="1"):
rq_set_pressure_timeout_minimum_vacuum(pressure, timeout, minimum, gripper_socket)
gPRE = rq_get_var("PRE", 3, gripper_socket)
while (gPRE != pressure):
rq_set_pressure_timeout_minimum_vacuum(pressure, timeout, minimum, gripper_socket)
sleep(0.008)
gPRE = rq_get_var("PRE", 3, gripper_socket)
end
rq_set_gripper_mode(mode, gripper_socket)
gMOD = rq_get_var("MOD", 3, gripper_socket)
while (gMOD != mode):
rq_set_gripper_mode(mode, gripper_socket)
sleep(0.008)
gMOD = rq_get_var("MOD", 3, gripper_socket)
end
end
def is_FLT_vacuum_timeout(gFLT):
if (gFLT == 6):
return True
end
return False
end
def is_continuous_grip(maximum_vacuum):
return maximum_vacuum == 0
end
def rq_vacuum_release(advanced_mode=False, shutoff_distance_cm=5, wait_for_object_released=True, gripper_socket="1"):
local shutoff_distance = scale(shutoff_distance_cm, [0, 99], [0.00, 0.99])
local pressure = 255
local minimum = 0
local timeout = 255
rq_vacuum_release_raw(advanced_mode, pressure, minimum, timeout, shutoff_distance, wait_for_object_released, gripper_socket)
end
def rq_vacuum_release_raw(advanced_mode, pressure, minimum, timeout, shutoff_distance, wait_for_object_released, gripper_socket):
rq_reset_fault_and_activate(gripper_socket)
if advanced_mode:
rq_set_vacuum_and_wait(pressure, timeout, minimum, 1, gripper_socket)
else:
rq_set_vacuum_and_wait(pressure, timeout, minimum, 0, gripper_socket)
end
# The following patch is for Robotiq's Camera issue when communication is lost, but not the activation
# the communication driver reset the GTO bit
rq_set_GTO_and_wait(1, gripper_socket)
if wait_for_object_released:
while (rq_is_vacuum_obj_detected(gripper_socket)):
if advanced_mode:
rq_set_vacuum_and_wait(pressure, timeout, minimum, 1, gripper_socket)
else:
rq_set_vacuum_and_wait(pressure, timeout, minimum, 0, gripper_socket)
end
# The following patch is for Robotiq's Camera issue when communication is lost, but not the activation
# the communication driver reset the GTO bit
rq_set_GTO_and_wait(1, gripper_socket)
sleep(0.01)
end
end
if advanced_mode:
startStopPumpOnDistanceTravelledThread(shutoff_distance, gripper_socket)
end
end
def rq_vacuum_grip(advanced_mode=False, maximum_vacuum=60, minimum_vacuum=40, timeout_ms=3000, wait_for_object_detected=True, gripper_socket="1"):
local pressure = scale(maximum_vacuum, [0, 100], [100, 0])
local minimum = scale(minimum_vacuum, [0, 100], [100, 0])
local timeout = scale(timeout_ms, [0, 25500], [0, 255])
rq_vacuum_grip_raw(advanced_mode, pressure, minimum, timeout, gripper_socket)
if wait_for_object_detected:
suction_completed = rq_wait_for_vacuum_object_suction_complete(gripper_socket)
if(not suction_completed):
rq_set_var("GTO", 0, gripper_socket)
end
end
end
def rq_vacuum_grip_raw(advanced_mode, pressure, minimum, timeout, gripper_socket):
stopStopPumpOnDistanceTravelledThread(gripper_socket)
rq_reset_fault_and_activate(gripper_socket)
if advanced_mode:
rq_set_vacuum_and_wait(pressure, timeout, minimum, 1, gripper_socket)
else:
rq_set_vacuum_and_wait(pressure, timeout, minimum, 0, gripper_socket)
end
rq_set_GTO_and_wait(1, gripper_socket)
end
def rq_reset_fault_and_activate(gripper_socket):
gFLT = rq_get_var("FLT", 2, gripper_socket)
if(not is_FLT_no_fault(gFLT)):
if(is_FLT_vacuum_timeout(gFLT)):
rq_set_GTO_and_wait(0, gripper_socket)
elif(is_FLT_faulted(gFLT)):
rq_set_GTO_and_wait(0, gripper_socket)
rq_set_var("ACT", 1, gripper_socket)
end
elif(not rq_is_gripper_activated(gripper_socket)):
rq_set_GTO_and_wait(0, gripper_socket)
rq_set_var("ACT", 1, gripper_socket)
end
end
#################################################
# End - Vacuum general functions
#################################################
bcastets
I never tested to control ePick this way but ePick and 2F or hande are controlled using similar commands.
Here below are the registers for ePick and 2F:
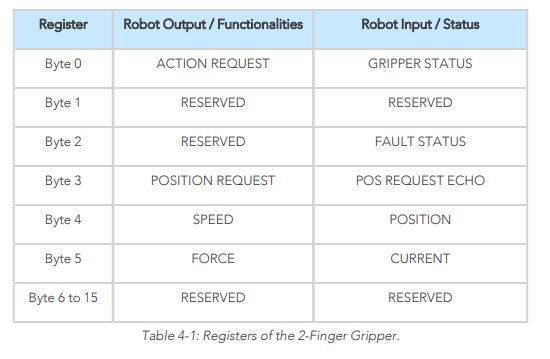
As you can see it is almost the same. Registers are just used differently.
- The "Position request" register of the 2F become "Max relative pressure level request" for ePick.
- The "Speed" register of the 2F become "Grip timeout/release delay" for ePick.
- The "Force" register of the 2F become "Minimum relative pressure level request" for ePick.
Here below is a compairison of action request register:
- 2F

- ePick
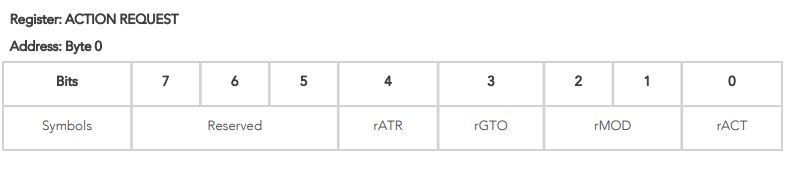
The main difference is that ePick action request register bit 1and 2 are use to set the vacuum mode "rMOD".
Looking at this, if would pass the following commands to actuate ePick:
#activate ePick
SET ACT 1
#Set go to bit to 0. This reset the gripper action request.
SET GTO 0
#Set gripper mode. 0 for Automatic mode OR 1 for Advanced mode. In this example we set advanced mode to manually set minimum and maximum vacuum. If you use Automatic mode no need to set min an max vacuum level.
SET MOD 1
#Set max vacuum level. 0 for 0%. 255 for 100%.
SET POS 255
#Set min vacuum level. 0 for 0%. 255 for 100%.
SET FOR 70
#Set go to bit to 1. The gripper will execute the action.
SET GTO 1
ePick manual will help you to understand the details:
https://assets.robotiq.com/website-assets/support_documents/document/EPick_Instruction_Manual_e-Series_PDF_20210709.pdf
I have robotiq 2f-85 and epick. I followed https://dof.robotiq.com/discussion/2489/problem-on-control-robotiq-gripper-mounted-on-ur-robot-via-socket-communication-python and ur-rtde. And I am able to control the 2f-85 on UR5 and UR10 properly, getting feedback and position accurately. But for the 'epick' it's not working properly. I am not able to understand what command should be SET and GET for the can be used for Epick, Like 'SET POS 0-255' is for 2f-85 and should not be working with Epick. With activate, both grippers get activated. Can you explain the proper use of the GET and SET commands so that I can turn it ON, OFF and get the object is present or not.