DoF - a Robotiq Community
Warning sign
The Dof Community was shut down in June 2023. This is a read-only archive.
If you have questions about Robotiq products please reach our support team.
bcastets

I would like to share with you some guidance about how to integrate a Robotiq device (ex: 2F, hande, epick or airpick) on a robot.
Keep in mind that the reference and updated information for information remain device manual.

First let's have a look to type of robot on which you may want to make an integration. The amount of work needed to make an integration will change depending on the robot.

I see 3 categories of robots:

  1. Plug & Play robots supported by robotiq
  2. Plug & Play robots supported by robot manufacturer
  3. Non supported to robot

1/ Plug & Play robots supported by robotiq

If you have no robotique integration experience choice the easy way, use a plug & play robot for which integration is supported by Robotiq.
For those robots Robotiq provide all you need to seamlessly integrate on the robot: hardware (coupling, cables,...), software and documentation.

At the time of this articles plug & play robots are (Please check robotiq support page for latest information
https://robotiq.com/support):
  • Universal Robot (All products)
  • Techman Robot (hande, 2F, ePick, airPick, FT300-S)
  • Omron Techman robot (hande, 2F, ePick, airPick, FT300-S)
  • Doosan (hande, 2F)
  • Aubo (hande, 2F)
  • Hanwha (hande, 2F)
Using a plug&play robot remove the integration challenge. Anyone can make it in few minutes !

Robotiq sells hardware kits for those supported robots so no need to scratch your head to know what you need. Your local distributor will be able to provide you those kits.

2/ Plug & Play robots supported by robot makers

Some other robot makers provide documentation and software for plug&play integration. Hardware is selected among robotiq accessories.

Those solution are directly supported by robot makers.

Here below are few example:
  • Kinova
  • Kassow
3/ Non supported robots

There is always a way to integrate robotiq gripper on a robot but you have to be skilled on how to integrate Modbus RTU device. It should be not problem for an integrator but challenging for a person who have no integration experience.

In this category are especially industrial robots.

On the next post will an overview about the robot information you need to know before starting integration.


bcastets

To make an integration on a non supported robot you need to know the following technical details:

  1. Tool mechanical connection
  2. Tool electrical connection
  3. Tool control capability

1/ Tool mechanical connection

There are different type of tool mechanical connection on the market.

Here are some examples with a 6 axis arm and a scara robot:

zoomzoom
The left type of flange is the most common and robotiq have some on the shelf accessories to perform mechanical connection. Mounting on other type of flange like the above scara robot example may be possible with an adaptive plate (example of adapter for scara robot: 
https://epson.com/Accessories/Robot-Accessories/Tool-Adapter---%28for-G3%2C-LS3%2C-T3%2C-RS3-and-RS4-Robots%29/p/R12NZ90035).
We will but the focus on the most common type of flange ( the left one).


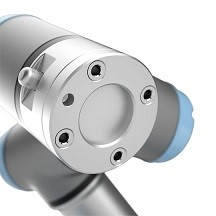
Here are the different elements with describes the tool mechanical connection:
  • PCD (Pitch Circle Diameter)
  • Threaded hole size
  • Number of threaded holes
  • Centering diameter and tolerance
  • Centering height
  • Pin diameter and tolerance
  • Flange diameter


zoom

The centering part of the flange is made to center the tool on the flange.
The pin is made to fix the orientation of the tool.

here below is an example of flange:

zoom

2/ Electrical connection
The electrical connection includes:
  • Communication lines
  • Power lines
Robots can offer the possibility to connect tools at the wrist (via a wrist connector) or at the robot controller. Those connection may include communication and power lines. It may be possible to have a robot without wrist or controller connection capability. In those cases connection can be done via a PLC (this PLC may also control the robot).

3/ Tool control capability
The control of the tool is done using:
  • a communication protocol
  • a software
There are several communication protocols:
  • Modbus RTU (Robotiq default communication protocol)
  • EtherCAT
  • Ethernet/IP
  • Modbus TCP
  • ProfiNET
  • CANopen
  • DeviceNet
To control a tool using one of those protocol, the controlling device (robot controller or PLC) need to be a master device.

You can find communication protocol available on the robot by checking its documentation.

Then come the software part to communicate using those protocol. Check how to use those protocol on the software side. The software complexity may vary from one robot to another. In some case you may have to write some piece of software.

Now that we know robot specification, in the next post we will see how to list the necessary equipment to integrate a Robotiq gripper.

bcastets

To find necessary hardware to make you integration you need to gather all the previously described robot information and match it with the suitable hardware.

Here below is an overview illustration of necessary component:

zoom

1/Tool mechanical connection

  • PCD (Pitch Circle Diameter)
  • Threaded hole size
  • Number of threaded holes
  • Centering diameter and tolerance
  • Centering height
  • Pin diameter and tolerance
  • Flange diameter
Robotiq offer a large variety of coupling an adaptive plate to mount grippers and other product on robot flange. In case where there are no on the shelf adaptive plate and coupling, it is possible to buy a blank coupling (AGC-CPL-BLANK-002) which can be machined to fit the flange.

You can find adaptive plate and coupling CAD on the Robotiq support page (
https://robotiq.com/support) in the section "Other robots".
2D drawing are also available in product manual which can be downloaded from the same page.

2/ Electrical connection
For not supported robot the connection at the robot controller (or PLC) is the most common one.
It is done with a 10m device cable (CBL-COM-2065-10-HF) connected on one side on the gripper coupling and on the other side on the robot controller, PLC or Robotiq universal controller (we will review it in the next point).

3/ Tool control capability

The default communication protocol of Robotiq device is modbus RTU. If the robot controller (or PLC) have modbus RTU communication capability the device cable can directly be connected on the robot controller (or PLC).
If the communication protocol available at the robot controller (or PLC) is different from Modbus RTU than a protocol converter is necessary to converter the default Modbus RTU protocol of the robotiq device in the supported communication protocol.

Robotiq can provide the following protocol converter called "Robotiq universal controller":

UNI-CTR-001-CANO: External controller -- CANopen
UNI-CTR-001-DNET: External controller -- DeviceNet
UNI-CTR-001-ECAT: External controller -- EtherCAT
UNI-CTR-001-ENIP: External controller - Ethernet/IP
UNI-CTR-001-MTCP: External controller - Modbus TCP
UNI-CTR-001-PNET: External controller -- ProfiNET

4/ The robotiq device
Final you will need to get the robotiq device you want to integration.


To resume you should the following hardware in your shopping list:
  1. Adaptor plate (If required. More details below.)
  2. Robotiq coupling (More details below)
  3. 10m cable (CBL-COM-2065-10-HF : 10m High-Flex Cable (straight connector))
  4. Robotiq Universal controller (Only if protocol different form Modbus RTU). Select the protocol you want to use to make the integration.
    UNI-CTR-001-CANO: External controller -- CANopen
    UNI-CTR-001-DNET: External controller -- DeviceNet
    UNI-CTR-001-ECAT: External controller -- EtherCAT
    UNI-CTR-001-ENIP: External controller - Ethernet/IP
    UNI-CTR-001-MTCP: External controller - Modbus TCP
    UNI-CTR-001-PNET: External controller -- ProfiNET
  5. Robotiq product

bcastets

Here is a practical case of integration on a non supported robot.

Let's say that I want to integrate the 2F85 on a
Kuka KR 6 R700-2 robot.

I am going quickly over the documentation. Don't take those comments as a reference for this robot. I may miss some details because I am not familiar with this robot. An experience Kuka integrator will have a better vision of robot capability than me.

A/ Collect robot information
************************************
1/Tool mechanical connection

This information is often easy to collect.
zoom

  • PCD (Pitch Circle Diameter): 31.5mm
  • Threaded hole size: M5
  • Number of threaded holes: 7 (possibility to use only 4 screws)
  • Centering diameter and tolerance: 20mm H7
  • Centering height: + 6.76mm
  • Pin diameter and tolerance: 5mm H7
  • Flange diameter: 40mm
2/Electrical connection

This is where it become more complex...This is where the help of an integrator with experience on this robot would help.

https://www.kuka.com/-/media/kuka-downloads/imported/9cb8e311bfd744b4b0eab25ca883f6d3/kuka_pb_kleinroboter_en.pdf
I see some connection in the side of the arm and at the base in commercial documentation. I am not sure about what is available. There are details information in manual. It looks like what is available depends on the option selected when purchasing the robot. I see some digital input and output at the wrist but don't see serial communication. A quick look at the documentation is not enough for me to clearly understand the capability.
zoom

On the controller side, there are 2 possible controller:


zoom
Let's say that we have the KR C5 controller. The manual show that ethercat interface is available. I am not sure if the controller can act as a ethercat master. Once again the good advise of an experience integrator would help.

zoom

zoom

3/ Tool control capability

Looking at the electrical connection I would say that Ethercat would be the best way to go. It looks possible to make an ethercat connection with the controller (Need to double check with Kuka experience integrator).
Manual say that devices must be configured with WorkVisual so it will be necessary to become familiar with it.

B/Necessary hardware
***************************
1/Tool mechanical connection
We are lucky ! Robotiq have a coupling which fit this robot and it is described in the manual:
zoom
The reference is GRP-CPL-063.

2/Electrical connection
We need a 10m device cable and a universal controller to converter ethercat in modbus RTU:
  • CBL-COM-2065-10-HF
  • UNI-CTR-001-ECAT
3/ Tool control capability
Will be done via ethercat through robotiq universal controller. We previously selected the hardware for the electrical connection.
An integrator will be in charge of doing the setup with WorkVisual. Ethercat setup files of the gripper are avaialble on robotiq support website:
https://assets.robotiq.com/website-assets/support_documents/document/Robotiq_AG_ECS_20181109.xml

4/Robotiq device
We will get a robotiq 2F85 gripper (AGC-GRP-2F85).